
[vc_row type=”full_width_content” full_screen_row_position=”middle” bg_image=”9″ bg_position=”center center” bg_repeat=”no-repeat” scene_position=”center” text_color=”light” text_align=”left” top_padding=”2.5%” bottom_padding=”2.5%” color_overlay=”#262f3f” overlay_strength=”0.95″][vc_column centered_text=”true” column_padding=”padding-3-percent” column_padding_position=”left-right” background_color_opacity=”1″ background_hover_color_opacity=”1″ width=”1/1″ tablet_text_alignment=”default” phone_text_alignment=”default”][vc_row_inner text_align=”left” el_id=”hide-it”][vc_column_inner enable_animation=”true” animation=”fade-in-from-bottom” column_padding=”padding-1-percent” column_padding_position=”bottom” background_color_opacity=”1″ width=”1/1″ delay=”200″][vc_column_text]
HUB Connector
[/vc_column_text][/vc_column_inner][/vc_row_inner][vc_row_inner bottom_padding=”30″ text_align=”left” el_id=”hide-it”][vc_column_inner enable_animation=”true” animation=”fade-in-from-bottom” column_padding=”no-extra-padding” column_padding_position=”all” background_color_opacity=”1″ width=”1/6″ delay=”300″][/vc_column_inner][vc_column_inner column_padding=”no-extra-padding” column_padding_position=”all” background_color_opacity=”1″ width=”2/3″][divider line_type=”No Line”][vc_column_text]
Thinkware / Payroll Software
[/vc_column_text][/vc_column_inner][vc_column_inner column_padding=”no-extra-padding” column_padding_position=”all” background_color_opacity=”1″ width=”1/6″][/vc_column_inner][/vc_row_inner][/vc_column][/vc_row][vc_row type=”in_container” full_screen_row_position=”middle” scene_position=”center” text_color=”dark” text_align=”left” top_padding=”4%” bottom_padding=”0px” overlay_strength=”0.3″][vc_column column_padding=”no-extra-padding” column_padding_position=”all” background_color_opacity=”1″ background_hover_color_opacity=”1″ width=”1/6″ tablet_text_alignment=”default” phone_text_alignment=”default”][/vc_column][vc_column column_padding=”no-extra-padding” column_padding_position=”all” background_color_opacity=”1″ background_hover_color_opacity=”1″ width=”2/3″ tablet_text_alignment=”default” phone_text_alignment=”default”][divider line_type=”No Line” custom_height=”40″][vc_row_inner text_align=”left”][vc_column_inner column_padding=”no-extra-padding” column_padding_position=”all” background_color_opacity=”1″ width=”1/2″][vc_column_text]
HUB Connect
[/vc_column_text][/vc_column_inner][vc_column_inner column_padding=”no-extra-padding” column_padding_position=”all” background_color_opacity=”1″ width=”1/6″][vc_column_text]
+
[/vc_column_text][/vc_column_inner][vc_column_inner column_padding=”no-extra-padding” column_padding_position=”all” background_color_opacity=”1″ width=”1/3″][image_with_animation image_url=”6767″ alignment=”” animation=”Fade In” box_shadow=”none” max_width=”100%”][/vc_column_inner][/vc_row_inner][divider line_type=”No Line” custom_height=”40″][divider line_type=”Full Width Line” line_thickness=”2″ divider_color=”default”][divider line_type=”No Line” custom_height=”60″][vc_column_text]
How does HUB Connect integrate with Thinkware?
[/vc_column_text][divider line_type=”No Line” custom_height=”60″][image_with_animation image_url=”6773″ alignment=”center” animation=”Fade In” box_shadow=”none” max_width=”100%”][divider line_type=”No Line” custom_height=”60″][vc_column_text]SwipeClock® integrates with ThinkWare’s DNet 2.0 through our API. Employee information from within DNet 2.0 is only pushed to SwipeClock® so the two systems stay in sync. Please note that this integration is not designed to send employee information out of SwipeClock and into DNet 2.0, DNet 2.0 will need to be the primary system of record.[/vc_column_text][/vc_column][vc_column column_padding=”no-extra-padding” column_padding_position=”all” background_color_opacity=”1″ background_hover_color_opacity=”1″ width=”1/6″ tablet_text_alignment=”default” phone_text_alignment=”default”][/vc_column][/vc_row][vc_row type=”in_container” full_screen_row_position=”middle” scene_position=”center” text_color=”dark” text_align=”left” top_padding=”4%” bottom_padding=”0px” overlay_strength=”0.3″][vc_column column_padding=”no-extra-padding” column_padding_position=”all” background_color_opacity=”1″ background_hover_color_opacity=”1″ width=”1/6″ tablet_text_alignment=”default” phone_text_alignment=”default”][/vc_column][vc_column column_padding=”no-extra-padding” column_padding_position=”all” background_color_opacity=”1″ background_hover_color_opacity=”1″ width=”2/3″ tablet_text_alignment=”default” phone_text_alignment=”default”][divider line_type=”No Line” custom_height=”30″][vc_column_text]
Key Benefits of Integrating Thinkware with HUB Connect
[/vc_column_text][divider line_type=”No Line” custom_height=”40″][divider line_type=”Full Width Line” line_thickness=”2″ divider_color=”default”][divider line_type=”No Line” custom_height=”40″][vc_row_inner equal_height=”yes” text_align=”left”][vc_column_inner column_padding=”no-extra-padding” column_padding_position=”all” background_color_opacity=”1″ width=”1/2″][vc_column_text]
Integrate in Minutes
No need to memorize multiple logins for Evolution Classic, Employee Portal, and TimeWorksPlus.[/vc_column_text][/vc_column_inner][vc_column_inner column_padding=”no-extra-padding” column_padding_position=”all” background_color_opacity=”1″ width=”1/2″][vc_column_text]
Improve Client Retention
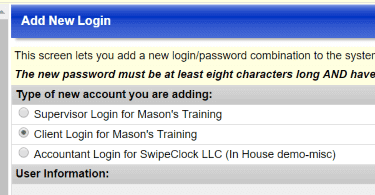
When your clients use Time & Attendance integrated with Payroll their retention increases.[/vc_column_text][/vc_column_inner][/vc_row_inner][vc_row_inner equal_height=”yes” text_align=”left”][vc_column_inner column_padding=”no-extra-padding” column_padding_position=”all” background_color_opacity=”1″ width=”1/1″][divider line_type=”No Line”][/vc_column_inner][/vc_row_inner][vc_row_inner equal_height=”yes” text_align=”left”][vc_column_inner column_padding=”no-extra-padding” column_padding_position=”all” background_color_opacity=”1″ width=”1/3″][/vc_column_inner][vc_column_inner column_padding=”no-extra-padding” column_padding_position=”all” background_color_opacity=”1″ width=”1/3″][nectar_btn size=”medium” button_style=”regular” button_color_2=”Accent-Color” icon_family=”none” url=”#” text=”Request a Demo”][/vc_column_inner][vc_column_inner column_padding=”no-extra-padding” column_padding_position=”all” background_color_opacity=”1″ width=”1/3″][/vc_column_inner][/vc_row_inner][/vc_column][vc_column column_padding=”no-extra-padding” column_padding_position=”all” background_color_opacity=”1″ background_hover_color_opacity=”1″ width=”1/6″ tablet_text_alignment=”default” phone_text_alignment=”default”][/vc_column][/vc_row][vc_row type=”in_container” full_screen_row_position=”middle” scene_position=”center” text_color=”dark” text_align=”left” top_padding=”4%” bottom_padding=”0px” overlay_strength=”0.3″][vc_column column_padding=”no-extra-padding” column_padding_position=”all” background_color_opacity=”1″ background_hover_color_opacity=”1″ width=”1/6″ tablet_text_alignment=”default” phone_text_alignment=”default”][/vc_column][vc_column column_padding=”no-extra-padding” column_padding_position=”all” background_color_opacity=”1″ background_hover_color_opacity=”1″ width=”2/3″ tablet_text_alignment=”default” phone_text_alignment=”default”][divider line_type=”No Line” custom_height=”15″][toggles style=”default”][toggle color=”Default” title=”How do I Enable the Thinkware Integration?”][divider line_type=”No Line” custom_height=”20″][vc_column_text]Integrating TimeWorksPlus with DNet 2.0 starts by creating an Accountant Level login in TimeWorksPlus. This credential, as well as the SwipeClock Site ID and a Client Level login, facilitate the connection. The Accountant Login will be supplied to you by SwipeClock.[/vc_column_text][divider line_type=”No Line” custom_height=”20″][vc_column_text]Creating a Client Login with TimeWorksPlus[/vc_column_text][divider line_type=”No Line” custom_height=”20″][vc_column_text]
- Select Maintenance Menu > Login Maintenance and click Add New Login.
- Create a Client Login and note the login name and password for reference.
[/vc_column_text][divider line_type=”No Line” custom_height=”20″][vc_column_text]Integrating the Two Accounts in DNet 2.0[/vc_column_text][divider line_type=”No Line” custom_height=”20″][vc_column_text]
- In DNet 2.0, access System Level > Setup > Company List > Edit and enter the Accountant login and password.
[/vc_column_text][divider line_type=”No Line” custom_height=”20″][divider line_type=”Full Width Line” line_thickness=”2″ divider_color=”default”][divider line_type=”No Line” custom_height=”20″][vc_column_text]
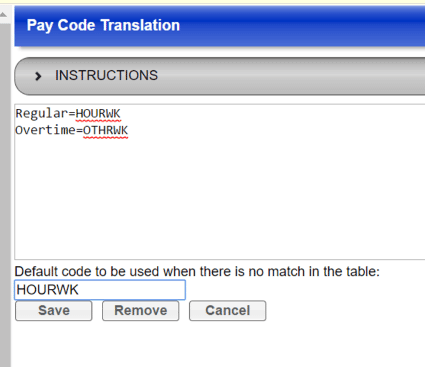
Pay Code Translation
[/vc_column_text][divider line_type=”No Line” custom_height=”20″][vc_column_text]In order for timecard export to payroll, Pay Code Translation needs to be setup in TimeWorksPlus.
To map punch categories to pay categories[/vc_column_text][divider line_type=”No Line” custom_height=”20″][vc_column_text]
- In TimeWorksPlus, click Settings Menu > Processing Rules > Processing > PayCodeTranslation.
- Use the text box to map the TWP Punch Category to a DNet Pay Code.
[/vc_column_text][divider line_type=”No Line” custom_height=”20″][vc_column_text]
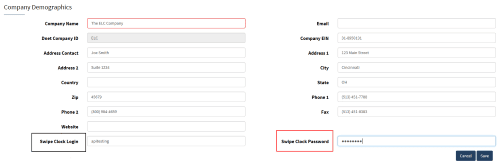
DNet 2.0 Client Login Setup
[/vc_column_text][divider line_type=”No Line” custom_height=”20″][vc_column_text]This is the default SwipeClock Login ID that will be used for client users on this account.*[/vc_column_text][divider line_type=”No Line” custom_height=”20″][vc_column_text]
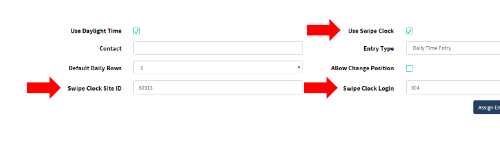
- In DNet 2.0, follow the click-path System User Level > Client Maintenance > Clients > Employee Time Punch Setup
- Select the Use SwipeClock checkbox
- Add the SwipeClock Site ID. This is the Site Code from the TimeWorksPlus client listing.
- Add a SwipeClock Login that matches a Client Level user in TimeWorksPlus. This is the default SwipeClock login ID that will be used for client users for this client.
*A user specific SwipeClock Login ID can be provided for individual client users to override this default.
[/vc_column_text][divider line_type=”No Line” custom_height=”20″][divider line_type=”Full Width Line” line_thickness=”2″ divider_color=”default”][divider line_type=”No Line” custom_height=”20″][vc_column_text]
Client User Login Override
[/vc_column_text][divider line_type=”No Line” custom_height=”20″][vc_column_text]If you want a DNet 2.0 user’s access to be mapped to a different TWP login, for the purpose of having access to different employees/permissions in SwipeClock[/vc_column_text][divider line_type=”No Line” custom_height=”20″][vc_column_text]
- Follow the path System Level > Users > Choose User > Edit Client Access > Edit
- Fill in the SwipeClock Login field with a SwipeClock login ID.
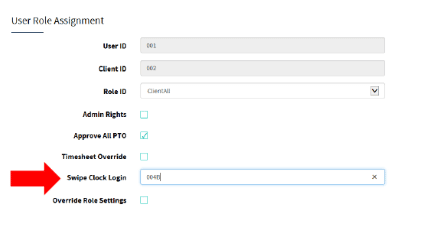
[/vc_column_text][divider line_type=”No Line” custom_height=”20″][divider line_type=”Full Width Line” line_thickness=”2″ divider_color=”default”][divider line_type=”No Line” custom_height=”20″][vc_column_text]
Employee Export
[/vc_column_text][divider line_type=”No Line” custom_height=”20″][vc_column_text]To populate employee data in TimeWorksPlus
- In DNet 2.0, follow the click-path System Level > Client Maintenance > Clients > Employee Time Punch Setup > Assign Employees
- Highlight the employees from the grid and click the Export to SwipeClock button
[/vc_column_text][divider line_type=”No Line” custom_height=”20″][divider line_type=”Full Width Line” line_thickness=”2″ divider_color=”default”][divider line_type=”No Line” custom_height=”20″][vc_column_text]
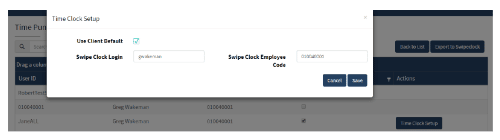
Employee Setup for SwipeClock Access
[/vc_column_text][divider line_type=”No Line” custom_height=”20″][vc_column_text]
- Follow the click-path System Level > Client Maintenance > Clients > Time Punch Setup > Assign Employees
- Select Time Clock Setup
- Add the SwipeClock login and SwipeClock Employee Code
[/vc_column_text][divider line_type=”No Line” custom_height=”20″][divider line_type=”Full Width Line” line_thickness=”2″ divider_color=”default”][divider line_type=”No Line” custom_height=”20″][vc_column_text]
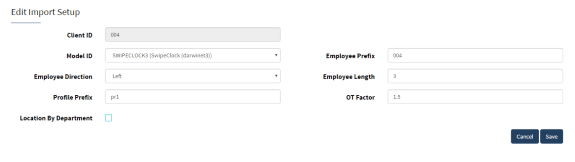
Import Setup
[/vc_column_text][divider line_type=”No Line” custom_height=”20″][vc_column_text]Configuring the time card import is done in DNet 2.0.[/vc_column_text][divider line_type=”No Line” custom_height=”20″][vc_column_text]
- Click System > Client Maintenance > Clients > Time Clock Import Setup
- Enter swipeclock3 as the Model ID for the import format
- Employee Prefix: Enter the Prefix that you would like added automatically to Employees
- Employee Direction: Choose from which direction to begin counting the number of characters of the Imported Employee ID as specified in the Employee Length field (i.e. if Employee Length is 4 and Employee Direction is “Right” we will use the rightmost 4 characters from the imported value)
- Employee Length: Choose the number of characters to use from the imported employee ID
- Profile Prefix: Static Prefix that will be added to the beginning of the Employee ID that is imported, following any rules specified in Employee Length and Employee Direction fields
- OT Factor: Enter the default Overtime rate
- Location by Department: Use if Department is associated with a specific location
[/vc_column_text][divider line_type=”No Line” custom_height=”20″][/toggle][toggle color=”Default” title=”What Data Syncs between Thinkware and SwipeClock?”][image_with_animation image_url=”6792″ alignment=”center” animation=”Fade In” box_shadow=”none” max_width=”100%”][divider line_type=”No Line” custom_height=”20″][/toggle][toggle color=”Default” title=”How do I View an Employee in SwipeClock?”][vc_column_text]To view the employees within SwipeClock take the following steps[/vc_column_text][divider line_type=”No Line” custom_height=”20″][vc_column_text]
- Log into DNet and access SwipeClock.
- Click on “Employee Setup” from the left-hand column.
- Click on the name of an employee to view their information in more detail.
- You can then fill out any additional details within the SwipeClock® interface.
[/vc_column_text][/toggle][toggle color=”Default” title=”Where do I go for Support for this Integration?”][vc_column_text]If you are an existing customer using this integration, please be aware that this integration is supported by ThinkWare.
For support regarding this integration, please contact ThinkWare’s support team by email: rfields@thinkwareinc.com or by phone: 513-598-3300.[/vc_column_text][/toggle][/toggles][/vc_column][vc_column column_padding=”no-extra-padding” column_padding_position=”all” background_color_opacity=”1″ background_hover_color_opacity=”1″ width=”1/6″ tablet_text_alignment=”default” phone_text_alignment=”default”][/vc_column][/vc_row]